You know what’s funny? You spend months meticulously planning your baby’s nursery, buying soft blankets, fancy mobiles, maybe even one of those high-tech “smart” toys, and then, your little one ignores it all. Instead, they’re mesmerised by the cardboard box the toy came in. Or a wooden spoon. Or that sock you didn’t even realise had fallen on the floor.
That’s exactly why Montessori-inspired toys have this magical, almost counterintuitive appeal. They’re simple, often homemade, and yet, somehow, they capture a baby’s curiosity better than any flashing, beeping gadget. And honestly?
There’s something deeply satisfying about making a toy yourself, watching your baby’s eyes light up as they explore textures, shapes, and sounds.
If you’ve ever felt a pang of guilt for wanting your baby to “play nicely” while you sneak in a shower or sip coffee, DIY Montessori toys might just be your secret weapon.
Montessori Philosophy. Explained Like You’re Chatting with a Friend
Montessori isn’t just a fancy buzzword on Pinterest. At its heart, it’s about respect: for the child, for their curiosity, and for the natural way they learn. Babies aren’t passive sponges; they’re little explorers, constantly testing their senses, practising coordination, and figuring out cause and effect. Montessori encourages just that.
Instead of overwhelming babies with a dozen bright, noisy toys at once, Montessori spaces are calm, intentional, and carefully “prepared.” Think of it like laying out a small invitation to explore: a wooden block here, a soft scarf there, a rattle within reach. That’s it. Simple, open-ended toys. The kind babies love because they can touch, shake, squeeze, and examine without being overstimulated.
And parents? We get a bonus: fewer tantrums over overstimulation and a little more breathing room. You might even catch yourself thinking, “Wow, this is kind of relaxing.” Especially when Grandma comes over, sees your plain wooden toys, and mutters, “Where are the batteries?”
Safety First. Because Peace of Mind is Priceless
Before you rush to the craft store with your toddler in tow, let’s talk safety. Honestly, it’s the part that makes DIY both fun and nerve-wracking. A few quick tips:
- Materials to love: wood, cotton, wool, silicone, food-grade stainless steel. Natural textures are not just safe, they’re irresistible to babies.
- Materials to avoid: small beads for under-3s, untreated or toxic finishes, anything with sharp edges.
- Finishing touches: Sand wooden surfaces smooth. Non-toxic finishes like food-grade beeswax or Rubio Monocoat can protect toys without chemicals.
- Choking hazards: Always keep an eye on small parts, and remember that even a seemingly large piece can be risky if a baby really wants to shove it in their mouth.
You’d be surprised how simple tweaks, like rounding edges, checking string lengths, or swapping a bead for a wooden ring, can make a toy safe and still fascinating.
DIY Toys Babies Actually Use
Let’s get into the fun part: toys. And I mean toys that babies actually reach for, chew on, and spend minutes (yes, minutes!) engrossed with.
Treasure Baskets (0–12 Months)
Ah, the treasure basket, Montessori gold. A small basket, filled with everyday objects, is a baby’s sensory playground. Think wooden spoons, soft cotton scarves, a smooth stone, and a teething ring.
- Why it works: Babies love variety and texture. They can explore different weights, shapes, and sounds.
- Seasonal twist: in autumn, add dried leaves or pinecones. In spring, colourful petals or small wooden flowers.
- Rotation tip: switch one or two items each week to keep curiosity alive.
The best part? You probably have most of these items at home already. No fancy trips to speciality stores needed.
Muffin-Tin Object Sorter (6–18 Months)
Here’s a simple coordination activity that doesn’t require a lot of space or prep.
- Use a muffin tin and small, safe objects like wooden beads, large pasta shells, or soft pom-poms.
- Let your baby place the items into the cups. It’s a subtle introduction to categorisation, hand-eye coordination, and focus.
Tidy parents, rejoice: everything stays in one container, and cleanup is a breeze. And toddlers love the challenge of trying again and again; watching their confidence grow is priceless.
Fabric Pull Box (6–12 Months)
Got a tissue box lying around? Perfect.
- Cut a hole slightly smaller than the fabric pieces you’ll insert.
- Add a variety of textures: silk, felt, cotton.
- Your baby will practice pulling items out and discovering different textures, hello, fine motor skills!
Honestly, it’s almost comedic to watch them get obsessed with one piece of fabric, only to toss it aside for another a minute later.
Wooden Ring Stacker (9–18 Months)
Another classic that’s both simple and endlessly engaging.
- Grab a dowel and wooden rings from any craft store.
- Stack, unstack, restack. Babies love repetition.
- Optional: leave rings natural or add a small, safe stain for visual appeal.
It’s not just about stacking; your child is learning problem-solving, coordination, and the joy of “I did it!”
Sensory Bottles (3–18 Months)
Ah, sensory bottles. Mesmerising, shiny, and oh-so-calming.
- Fill a clear plastic or glass bottle with water, rice, beads, glitter, careful not to overdo it.
- Themes: an “ocean” bottle with blue water and shells, a “rain” bottle with silver glitter, and autumn with dried leaves.
- Seal carefully with glue or epoxy to avoid spills.
They’re perfect for moments when you need to grab two minutes of calm. Babies can spend ages shaking, watching, and rolling them around.
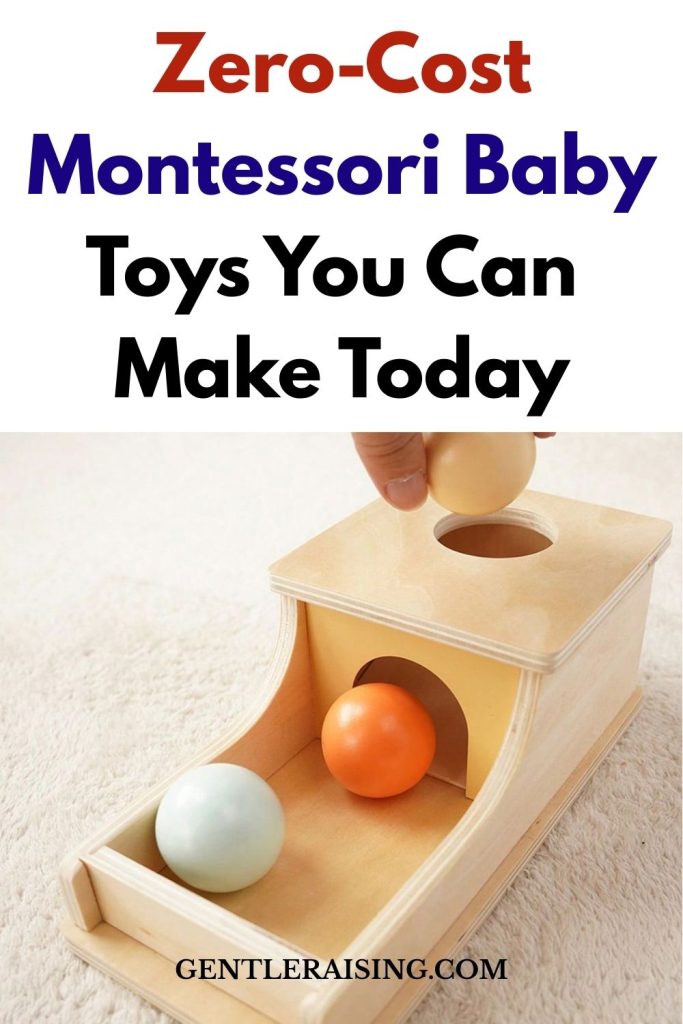
Object Permanence Box (6–12 Months)
The classic Montessori fascination: put something in, watch it disappear, and wait for the discovery.
- Build one at home with a small wooden box and a hole on top.
- Use small blocks or balls for your baby to drop inside.
- The joy when the object “magically” reappears is…well, magical.
Beginners in woodworking, don’t fret: a small wooden crate with a lid works just fine. It’s about the concept, not perfection.
DIY Pull Toy (12–24 Months)
Once walking is on the horizon, pull toys encourage confidence.
- A simple block of wood, wheels, and string is all you need.
- Add a shape or animal for fun.
- Toddlers love to “walk” their toys, giving them a sense of independence and accomplishment.
Seasonal variations? You bet. A snowman in winter, a bunny in spring, or just a classic wooden dog.
Discovery Basket for Crawlers (6–12 Months)
For babies just starting to crawl, a basket full of diverse textures and materials is pure gold.
- Include metallic spoons, soft toys, wooden blocks, rubber balls, and natural objects like pinecones.
- Swap items weekly to keep novelty high.
- You’ll notice your baby exploring in ways you never imagined, turning over, tapping, shaking, and mouthing safely.
Creating a Montessori Corner at Home (Without Turning Your Living Room Upside Down)
You don’t need an entire room. Montessori spaces can be cosy, low, and intentional:
- Use a low shelf to display a handful of toys. Babies can reach for them independently.
- Rotation matters: 3–5 toys per shelf is plenty. Babies focus better with fewer options.
- Lighting: soft natural light or warm lamps create a calm environment.
- Comfort: a small rug or mat helps define the play area.
Even in a small apartment, these tweaks make a huge difference. It’s not about Instagram-perfect setups, it’s about calm, intentional play.
When DIY Isn’t Working (Because Parents Are Human)
Some days, you just don’t have the bandwidth to DIY. Totally fine.
- Mix DIY toys with store-bought Montessori-inspired items: think Lovevery, Grimm’s, or Monti Kids.
- Open-ended puzzles, texture books, and wooden stacking toys still align with Montessori principles.
- The key? Connection, not perfection. Your presence matters more than any toy.
Montessori on a Budget
Not every parent has hours to craft or piles of money for materials. Here’s the good news: Montessori is hugely adaptable.
- Thrift stores: kitchen utensils, small wooden objects, soft fabrics.
- Repurposing: old boxes, jars, or even spare cloth napkins.
- Community: share toys with friends, swap items, or organise small neighbourhood rotations.
Creativity thrives with constraint. Sometimes, a cardboard tube becomes a favourite toy because it’s just…different.
Real-Life Stories and Parent Notes
One mom shared how her baby ignored a $60 electronic rattle but spent 20 minutes shaking a jar filled with dried beans. Another father laughed as his toddler crawled across the living room just to grab a wooden spoon, completely absorbed.
Babies teach us patience and presence. They remind us that they don’t need flashy gadgets to learn and explore. They need connection, curiosity, and the joy of discovering something new, over and over again.
And honestly? Watching them concentrate, frown, giggle, and repeat actions endlessly, it’s pure magic.
Wrapping It Up
DIY Montessori toys aren’t just about saving money or creating Instagram-worthy setups. They’re about respecting your baby’s curiosity, engaging their senses, and giving them freedom to explore safely.
Start small: one treasure basket, one sensory bottle, or a simple wooden stacker. See what your baby gravitates toward. Observe. Laugh. Join them in discovery.
Remember, the toys are tools, but your time, attention, and presence? That’s the real magic.
So go ahead, grab a basket, a few household items, and just watch the wonder unfold. You might be surprised how much joy a little simplicity can bring.